Following on from my previous blog entry "Modifying the Base Template" I decided to put together a quick blog to
show how to create a small VirtualBox, guest, that can be used to
execute the ModifyJeOS and hence edit you templates. One of the
main advantages of this is that Templates can be created away from
the Exalogic Environment. For the Guest OS I chose Oracle Linux 6u3 and
decided to create it as a basic server because I did not require a
graphical interface but it's a simple change to create it with a
GUI.
 Once the guest has been created attach the previously downloaded Oracle Linux u3 iso to the cd drive and start the guest.
 Complete the installation and reboot the Guest. At this point we
now have a basic Oracle Linux server running.
Complete the installation and reboot the Guest. At this point we
now have a basic Oracle Linux server running.
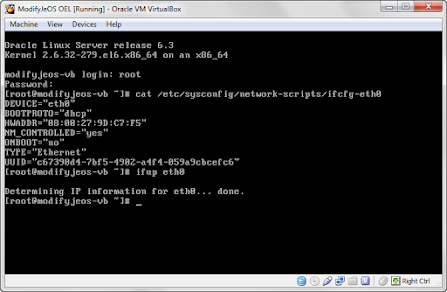 This will start the eth0 connection but once the Guest is
rebooted the network will be down again. To resolve this you will
need to edit the /etc/sysconfig/network-scripts/ifcfg-eth0 file
and change the ONBOOT parameter to "yes".
This will start the eth0 connection but once the Guest is
rebooted the network will be down again. To resolve this you will
need to edit the /etc/sysconfig/network-scripts/ifcfg-eth0 file
and change the ONBOOT parameter to "yes".
Now we have enabled the network we will need to install a number of addition rpm. First we will need to configure the yum repository (/etc/yum.repos.d) as follows:
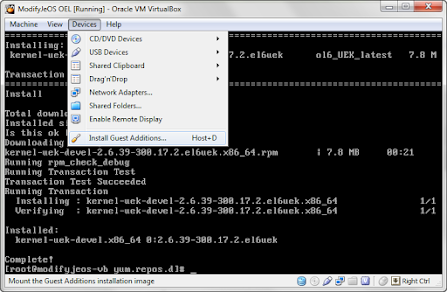
So select Devices->InstallGuest Additions on you running guest:
This will simply place the VirtualBoxGuestAdditions.iso in the virtual cd and we will need to execute the following before we can run them.
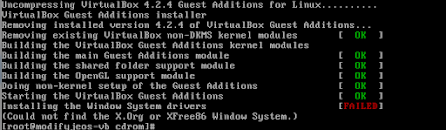
 This will initiate the install and kernel rebuild. What you will
notice is that during the installation a Failed will be displayed
but this is simply because we have no graphical components.
This will initiate the install and kernel rebuild. What you will
notice is that during the installation a Failed will be displayed
but this is simply because we have no graphical components.
 At this point we the installation will also have added the vboxsf
group to the system and to access any shared folders we will
create our user will need to be a member of this group an so the
next stage is to add the root user to this group as follows:
At this point we the installation will also have added the vboxsf
group to the system and to access any shared folders we will
create our user will need to be a member of this group an so the
next stage is to add the root user to this group as follows:
Install ModifyJeOS
Once the shared folder has been added restart the guest and
change directory into the shared folder (/media/sf_<folder
name>). For the next step I am assuming the ModifyJeOS rpms are
located in the shared folder. We can simply execute:

Using ModifyJeOS
I have a modified MountSystemImg.sh script that should be copied
into the /root/bin directory (you may need to create this) and
from here it can be executed from any location:
In the example below I have extracted the Base template within the shared folder and then renamed it OEL_40GB_ROOT before changing into that directory and executing the script.

 One thing that we need to remember is to remove the / when
editing files or creating links and so :
One thing that we need to remember is to remove the / when
editing files or creating links and so :
Required Software
Creating the VM
I'll assume that the reader is experienced with Virtual Box and installing Oracle Linux and hence will make this section brief.Create VirtualBox Guest
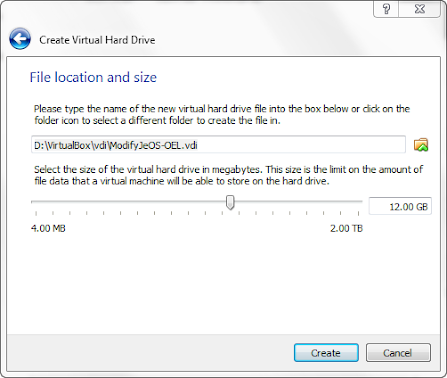
Create a new VirtualBox Guest and select oracle Linux 64 bit. Follow through the create process and select Dynamic Disk Size and the default 12GB disk size. The actual image will be a lot smaller than this but the Oracle Linux install will fail with insufficient disk space if you attempt a smaller size.Install Oracle Linux
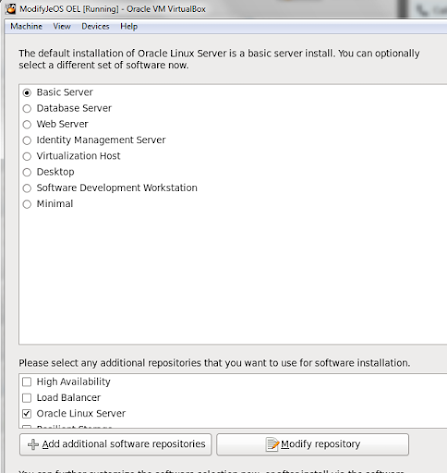
On starting the guest the system will boot off the associated Oracle Linux u3 iso and take you through the standard installation process. Select all the appropriate information but when you reach the installation type select Basic Server because we do not need that additional packages and only need to access through the command line interface.Installing Guest Add-ons
Before we can easily access the Guest we will need to add the VirtualBox guest add-ons. These will provide better keyboard and mouse integration and allow access the shared folders on the host machine. Before we can do this we will need to do the following:- Enable Networking.
- Install additional rpms.
ifup eth0
Now we have enabled the network we will need to install a number of addition rpm. First we will need to configure the yum repository (/etc/yum.repos.d) as follows:
[ol6_latest]
name=Oracle Linux $releasever Latest ($basearch)
baseurl=http://public-yum.oracle.com/repo/OracleLinux/OL6/latest/$basearch/
gpgkey=http://public-yum.oracle.com/RPM-GPG-KEY-oracle-ol6
gpgcheck=1
enabled=1

[ol6_ga_base]
name=Oracle Linux $releasever GA installation media copy ($basearch)
baseurl=http://public-yum.oracle.com/repo/OracleLinux/OL6/0/base/$basearch/
gpgkey=http://public-yum.oracle.com/RPM-GPG-KEY-oracle-ol6
gpgcheck=1
enabled=0

[ol6_u1_base]
name=Oracle Linux $releasever Update 1 installation media copy ($basearch)
baseurl=http://public-yum.oracle.com/repo/OracleLinux/OL6/1/base/$basearch/
gpgkey=http://public-yum.oracle.com/RPM-GPG-KEY-oracle-ol6
gpgcheck=1
enabled=0

[ol6_u2_base]
name=Oracle Linux $releasever Update 2 installation media copy ($basearch)
baseurl=http://public-yum.oracle.com/repo/OracleLinux/OL6/2/base/$basearch/
gpgkey=http://public-yum.oracle.com/RPM-GPG-KEY-oracle-ol6
gpgcheck=1
enabled=0

[ol6_u3_base]
name=Oracle Linux $releasever Update 3 installation media copy ($basearch)
baseurl=http://public-yum.oracle.com/repo/OracleLinux/OL6/3/base/$basearch/
gpgkey=http://public-yum.oracle.com/RPM-GPG-KEY-oracle-ol6
gpgcheck=1
enabled=0

[ol6_UEK_latest]
name=Latest Unbreakable Enterprise Kernel for Oracle Linux $releasever ($basearch)
baseurl=http://public-yum.oracle.com/repo/OracleLinux/OL6/UEK/latest/$basearch/
gpgkey=http://public-yum.oracle.com/RPM-GPG-KEY-oracle-ol6
gpgcheck=1
enabled=1

[ol6_UEK_base]
name=Unbreakable Enterprise Kernel for Oracle Linux $releasever ($basearch)
baseurl=http://public-yum.oracle.com/repo/OracleLinux/OL6/UEK/base/$basearch/
gpgkey=http://public-yum.oracle.com/RPM-GPG-KEY-oracle-ol6
gpgcheck=1
enabled=0
Once the repository has been edited we will need to execute the following yum commands:
yum update
yum install gcc
yum install kernel-uek-devel
yum install kernel-devel
yum install createrepo
At this point we now have all the additional packages required to install the VirtualBox Guest Add-ons.
So select Devices->InstallGuest Additions on you running guest:
This will simply place the VirtualBoxGuestAdditions.iso in the virtual cd and we will need to execute the following before we can run them.
mkdir /media/cdrom
mount -t iso9660 -o ro /dev/cdrom /media/cdrom
cd /media/cdrom/
ls
./VBoxLinuxAdditions.run
usermod -G vboxsf root

cat /etc/group
cat /etc/passwd
init 0
Now simply shutdown the guest and add the Shared folder within your guests settings.
Install ModifyJeOS
Once the shared folder has been added restart the guest and
change directory into the shared folder (/media/sf_<folder
name>). For the next step I am assuming the ModifyJeOS rpms are
located in the shared folder. We can simply execute:rpm -ivh ovm-modify-jeos-1.1.0-17.el5.noarch.rpm # Test with modifyjeos
Using ModifyJeOS
I have a modified MountSystemImg.sh script that should be copied
into the /root/bin directory (you may need to create this) and
from here it can be executed from any location:MountSystemImg.sh
#!/bin/sh

# The script assumes it's being run from the directory containing the System.img

# Export for later i.e. during unmount
export LOOP=`losetup -f`
export SYSTEMIMGDIR=/mnt/elsystem
export SYSTEMIMG=System.img
export TEMPLATEDIR=`pwd`

# Read Parameters
while [ $# -gt 0 ]
do
 case "$1" in
  -i) SYSTEMIMG="$2"; shift;;
  *) echo ""; echo >&2 \
      "usage: $0 [-i <System Image Name (Default System.img)> "
      echo""; exit 1;;
  *) break;;
 esac
 shift
done

# Make Temp Mount Directory
mkdir -p $SYSTEMIMGDIR
# Create Loop for the System Image
losetup $LOOP $SYSTEMIMG
kpartx -a $LOOP
mount /dev/mapper/`basename $LOOP`p2 $SYSTEMIMGDIR
#Change Dir into mounted Image
cd $SYSTEMIMGDIR
echo "######################################################################"
echo "###                                                                ###"
echo "### Starting Bash shell for editing. When completed log out to     ###"
echo "### Unmount the System.img file.                                   ###"
echo "###                                                                ###"
echo "######################################################################"
echo
bash
cd ~
cd $TEMPLATEDIR
umount $SYSTEMIMGDIR
kpartx -d $LOOP
losetup -d $LOOP
rm -rf $SYSTEMIMGDIR
This script will simple create a mount directory, mount the
System.img and then start a new shell in the mounted directory. On
exiting the shell it will unmount the System.img. It only requires
that you execute the script in the directory containing the
System.img. These can be created under the mounted shared
directory. In the example below I have extracted the Base template within the shared folder and then renamed it OEL_40GB_ROOT before changing into that directory and executing the script.
Modifying Files in the System.img
Once you have mounted the System.img script, above, you will be placed in a bash shell and located in the /mnt/elsystem directory. This directory represents the root of the System.img file and from here we can access the various files within, what will be, the vServers file system.vi /etc/hosts becomes vi etc/hosts vi /etc/fstab becomes vi etc/fstabWhen creating links these must all be done as relative link so to set the System Time Zone we would normally execute:
ln -sf /usr/share/zoneinfo/GMT /etc/localtimeBut this is replaced with:
cd etc
ln -sf ../usr/share/zoneinfo/GMT localtime
No comments:
Post a Comment